

Blues Scale Turnarounds
In this lesson we embellish the turnaround section using blues scales. We introduce blues scale phrases and licks that are built from both the major and minor blues scales and we examine which chords are suited to which blues scale variation.
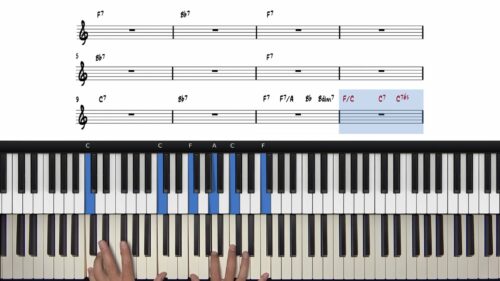
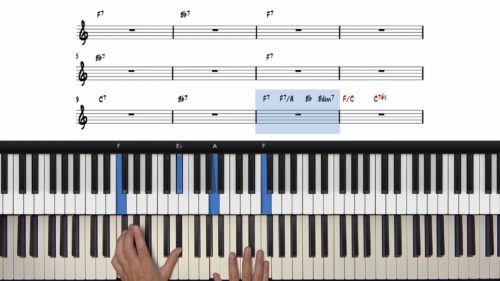
The minor blues scale is well-suited to the harmony of the IV chord, and the major blues scale works well over the I and V chords. Towards the end of the lesson we intertwine both major and minor blues scale embellishments in a single turnaround phrase.
Apply To The Different Registers
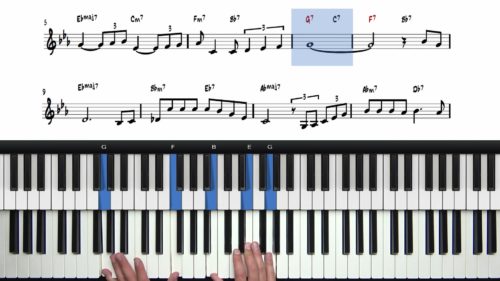
Shifting the blues scale phrases and licks up and down the keyboard to the different octaves can be used to create textural effects and voicing possibilities. We apply the same blues scale phrases in the middle of the piano, and also in the higher and lower octaves.
Turnaround Options
Remember that using blues scales in the turnaround passage is just one of many options that we have available to us. In this module we cover 4 distinctly different approaches to navigating the turnaround and so be sure to practice these individually and apply them spontaneously and creatively when playing the 12 bar blues.
Lesson Downloads
-
 Blues Scale Turnarounds File Type: pdf
 -
Blues Licks with Fingerings File Type: pdf
Related Lessons
You will learn how to embellish the turnaround section of the 12 bar blues with blues scale licks using both the majo...
Typically, being placed on the last 2 bars of the form, the turnaround is used to lead smoothly and convincingly back...
In this lesson we will learn how to embellish the turnaround sections with extensions, echoing, inner voices, USTs, a...
Practice Tips
-
Understand the distinction between the minor and major blues scales and the harmonic situations where they are best suited.
-
The F major blues scale works well over the I and V chords, and the F minor blues scale pairs well with the IV chord.
-
Be patient when learning the blues scale licks, breaking them down into smaller fragments if necessary.
-
Isolate the licks in your right hand and once you are comfortable with the shapes you can combine them with the left hand bass lines and chordal movements.
- Practice the blues licks and blues phrases slowly, focusing on accuracy, and gradually speed up the tempo.
I played at my yacht club Thursday night Hayden. The blues in F which I once again applied to Driftin Blues. I got a standing ovation and asked not to stop!
It felt good Hayden. You are an outstanding teacher, and I am a humble student. You are beyond your young years Hayden!
Thank you my friend.
Cheers 🙂
Hey Glenn 👋 – thanks for letting me know and it makes me really happy to hear that. I would have loved to have heard your yacht club performance! Congrats on the public performance as I know it can be intimidating but it gets easier and easier the more we do it.
I have a passion for the blues and so I’m having a blast creating these lessons and also learning more about the style myself. I think I mentioned already but I’m happy that you requested this in the seminar section as that was the original motivation to start this course.
I always have a backlog of requests for different styles and tunes to cover etc… and this is one that I am particularly enjoying working on.
I’m still mapping out the improvisation module and I have some cool things to share so far.
I’m also going to do some lessons on left hand tricks. There so many avenues to explore with the style!
As mentioned I have some material ready to teach which incorporates the Ray Charles tune that you like, and also I’m absorbing the walk up and sus chord techniques used in the “hipster blues stormy monday” video that you sent me. The latter will be great for a lesson on sus chords in the slow blues which I had already planned to cover.
I’m aiming to get more lessons recorded this week so keep an eye on the course page for new additions.
Talk soon, Hayden
I know from my personal experience that fingerings are a pretty personal subject. Yet, if a person who masters the subject – the teacher – gives the student an idea on how the fingerings may look like, then this a great help for the student. He gets a first version of a feasible fingering, which he then can modify to his hands, their size, elasticity etc etc.
Can you give me your fingerings specifically the more complicated areas with the grace notes, please?
Following from the comment above – it would be really helpful to have some suggested fingering (for small hands) for the licks in the latter half of the lesson, since I’m struggling to find something that works. It’s very hard to tell from the video what you are doing, even if I slow it down! Thanks!
Hi Lucy 👋
Thanks for the feedback.
I’ve added some suggested fingerings to the first page of the PDF here:
https://pianogroove.com/media/2026/05/fingering-for-Lucy.pdf
Please could you let me know if this is helpful? If so, I’ll go ahead and add the fingerings for the second page too.
I’d also be interested to understand what would make this clearer in the lesson itself. For example, around 11:18–12:20, I spend some time demonstrating the movement of the major blues lick and explaining which fingers hit which notes.
Are the finger movements visible enough for you in that section, or would it be more helpful if I specifically named each finger as I play through the phrase?
Similarly, for one of the more complicated examples around **9:56–10:05**, I play the lick quite slowly. When I slow the video down to around 40% or 30%, the finger movements look fairly clear on my screen, but I appreciate that this may vary depending on the device being used.
Would it help if I demonstrated these examples even slower in future lessons, or if I verbally outlined the fingering note by note?
Also, could you let me know what device you’re using to watch the lessons? I’m viewing them full-screen on a 16-inch MacBook, so it would be useful to know if the experience is different on a smaller screen or tablet.
Please check the PDF when you get a chance and let me know whether the added fingerings are useful. If they are, I’ll finish the rest of the document for you.
Best,
Hayden
Thanks so much Hayden, the fingerings you have added work well for me!
I am also using a 16 inch mac on full screen. It’s hard to explain why I find it so difficult to get the fingerings from watching what your hands are doing – I guess it may depend on different learning styles? I would not say I’m so much a ‘visual learner’ – I really benefit from having things written down. Probably part of it is that I originally learnt to play piano as a kid from reading sheet music with fingerings written on, so I may be able to process that type information more quickly. When I’m watching your videos, even slowed down, my eyes are switching between the transcription and your hand movements, and then I’m trying to copy and remember the sequence of movements you did. When I’m working from a transcription with fingerings on, all the information is in one place so I can practice it repeatedly more quickly and hopefully commit it to memory faster.
With fingerings I completely get that working stuff out for myself is a useful process to go through, and that I need to find what is comfortable for me. However, it is still really interesting/helpful to understand what you are doing, to give me ideas for the smoothest movements.
These are the first licks I have tried to learn (I have been focusing on chords so far) and, particularly where grace notes are involved, its really helpful to see how you position your hands to fit everything in when notes are moving so fast. So yes, maybe in the videos you could sometimes say the fingering numbers for tricky bits and highlight how you are moving your hands (e.g. ‘I’m putting my four over my one here’).
Thanks very much!
Lucy
(just a note – in the penultimate bar of Example 2 on the C+ you put a 3,1 fingering – is this what you intended? wondered if supposed to be 5,3?
Yes I did purposefully write it down with the 3rd finger on top. I double checked that’s how I play it in the video (6:29 to 6:41).
The top note of the C7#5 chord (G#) can be resolved up a half step into the major 3rd of the F chord and I’d probably play that more often than not. In this specific example (6:29 to 6:41 in the lesson) I move down an octave to resolve into the 3rd of the 1 chord F major. It seems that fingering choice was more ‘muscle memory’ than a conscious decision.
This is a good example of where different fingerings could be applied. If we resolve into the 3rd an octave down, or add a passing chord such as a Gb13 which also has G#/Ab as the top note, then playing the #5 of the C7 chord with the 5th in the melody would make sense.
Flexibility in fingering is also important so try both… play the G# with the 3rd and resolve the melody up a half step into the 1 chord (usually with a grace note into the A of Fmaj7).
Next play the same note with the 5th finger and add a Gb13 passing chord:
LH: Gb and E
Rh: Bb, Eb, Ab(G#)
This Gb13 voicing resolves down to F13 or F9 very nicely. I prefer the F9.
I hope that helps.
Cheers,
Hayden
Hi Lucy,
Thanks for the detailed explanation.
I think you’re right that this comes down partly to learning styles and also our musical backgrounds. If we originally learned from written scores with fingerings marked in, then it’s completely natural that our brain processes the information more efficiently when it’s all consolidated visually in one place.
I can definitely incorporate more fingering related explanations into my narration in future lessons – especially for sequences that contain grace notes and fast melodic sequences.
Glad to hear that the fingering PDF is useful. I’ll finish the second page of the PDF for you shortly.
Best,
Hayden
Hi Lucy,
I have completed the fingerings for the blues licks and added a 2nd PDF file to the “Downloads” section entitled “Blues Licks with Fingerings”.
Please let me know if I can help further and enjoy the lessons.
Best,
Hayden
Thanks so much Hayden,, that’s really helpful.
The main things I struggle with are working out whether to use the same or different finger for a grace note/landing note, and when to lift up and reposition my hand completely. This helps with both.
From what I have seen so far, you often use the same finger/thumb if a grace note is a semitone above the landing note and is a black note?
Lucy
My pleasure, Lucy.
Yes that’s correct… we always use the same finger if we are ‘crushing down’ from a black note.
It’s possible to ‘crush up’ too – for example the note F to Gb in the C blues scale – but it’s not physically possible to use 1 finger for this so we have to use 2 fingers.
The blues scales are laid out differently in different keys. For example the C minor blues scale and the G minor blues scale are very similar in their shape. The b5 (also known as the ‘blue note’)is a black note note in those keys/scales.
For the F minor blues scale that we are using in this lesson, the b5 is the note “B” which is a white note, and so we can’t ‘crush down’ form the b5 to the natural 5th (B to C) using one finger (as they are both white notes), so we have to use 2 fingers. That’s one of the nuances of the F minor blues scale.
——
You might like to check out the slow blues course in the key of C next: https://www.pianogroove.com/blues-piano-lessons/slow-blues-in-c-harmony-improv/
And also here is a slow blues improvisation seminar in the key of C: https://www.pianogroove.com/live-seminars/slow-blues-piano-improvisation/
Learning the blues in multiple keys is highly recommended as it helps solidify our understanding when we see the same chord progressions, fills, licks, passing chords etc… applied in a different key. It’s a gradual process so it doesn’t happen overnight but if you feel ready to learn the slow blues in C, I feel that would be a nice little project for you.
These courses are mixed-level by the way, and as each lesson passes we add an extra layer of sophistication to the harmony, fills, and general arranging style, so it’s natural to to find this challenging (as I remember you mentioned that these are the first blues licks you’re learning).
—–
Also be sure to listen to lots of slow blues, here’s a playlist I created with some soulful slow blues recordings: https://open.spotify.com/playlist/2K7F2NDS2WVzIrjB1USjj9?si=134c39610ebd4236 – many of them are piano-vocal (James Booker) but the last one is solo piano (Kenny Barron).
Cheers,
Hayden
Brilliant – all so helpful – thanks again!
My pleasure, Lucy!
If you have any other questions don’t hesitate to get in touch.
Cheers,
Hayden